Are you a desk worker feeling the effects of prolonged sitting? Do you experience stiffness in your back and shoulders after a long day? You're not alone! Millions face these challenges, but the good news is that relief is within reach. This guide is your passport to improved spinal flexibility, reduced back pain, and a more energized you, all from the comfort of your home. We'll explore five essential yoga poses, perfectly tailored for beginners and anyone seeking a simple yet effective routine. Get ready to find your flow and reclaim your well-being!
Why This Workout is Perfect for Home Beginners
Home yoga offers unparalleled convenience and accessibility. No need to commute or invest in expensive gym memberships. You can practice anytime, anywhere, and at your own pace. This particular routine is designed specifically for beginners, with modifications and clear instructions to ensure a safe and enjoyable experience. The poses are chosen to target key areas of the spine, combating the stiffness that often comes with desk work. This means you can improve your flexibility, reduce back pain, and increase your energy levels – all without leaving your living room.
Consider Sarah, a marketing executive who used to suffer from chronic back pain due to her desk job. After incorporating a daily 10-minute yoga routine, she noticed a significant reduction in pain and improved posture. She now starts her day with these poses, feeling more focused and less stressed. Or take John, a software developer, who found that regular stretching helped him avoid the typical aches and pains associated with long coding sessions. He now swears by these simple poses and recommends them to all his colleagues.
Essential Moves You'll Need
This sequence focuses on opening up the spine, increasing mobility, and relieving tension in the back and shoulders. Each pose is explained with step-by-step instructions and modifications to suit your individual needs. Remember to listen to your body, and never push yourself beyond a comfortable range of motion. The goal is to gently release tension, not to force a stretch.
Here are the 5 poses:
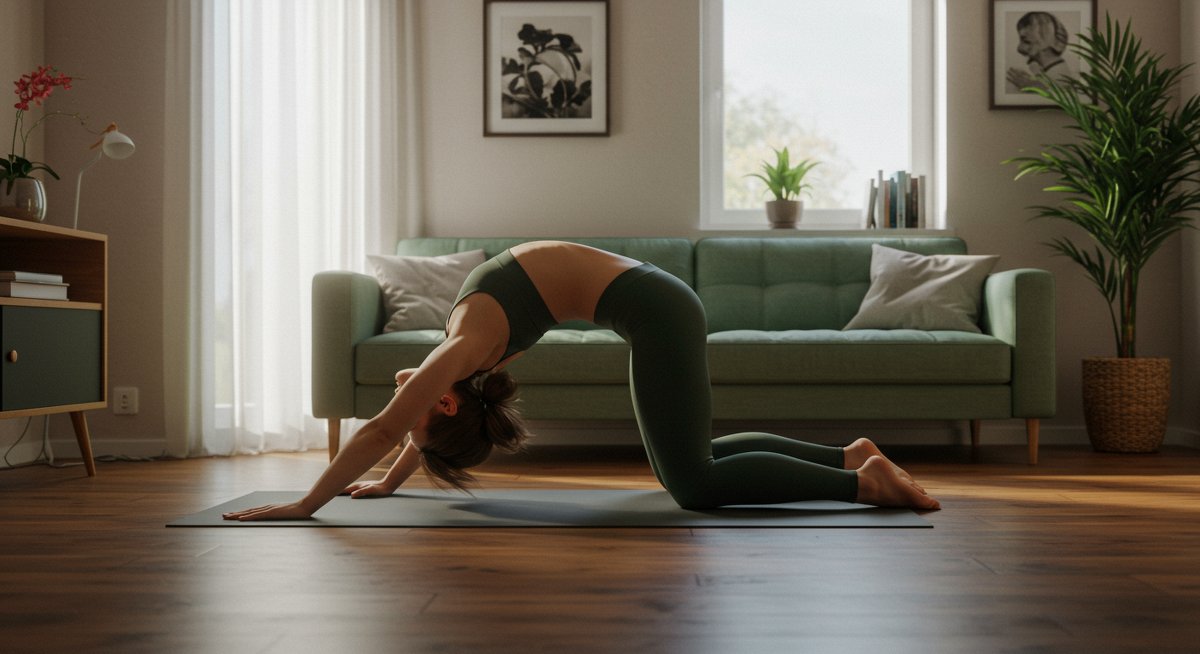
Cat-Cow Pose: This dynamic flow gently warms up the spine and improves flexibility. Start on your hands and knees, with your wrists under your shoulders and knees under your hips. Inhale, drop your belly, arch your back, and lift your head and tailbone (Cow Pose). Exhale, round your spine towards the ceiling, tuck your chin to your chest, and draw your navel towards your spine (Cat Pose). Repeat this flow 5-10 times.
- Example: Picture yourself taking a quick break from your computer. Even just 3-4 rounds of Cat-Cow can bring immediate relief to your back and shoulders.
- Common Mistakes: Avoid overarching your lower back in Cow Pose. Keep your core engaged to support your spine.
- Expert Tip: Coordinate your breath with your movements. Inhale as you arch, and exhale as you round.
Sphinx Pose: A gentle backbend that opens the chest and stretches the spine. Lie on your stomach with your elbows under your shoulders and your forearms on the floor. Keep your legs extended and your feet relaxed. Gently lift your chest, keeping your lower body grounded. Hold for 30-60 seconds.
- Example: If you feel a slight pinching in your lower back, reduce the height of your chest lift. This pose is excellent for counteracting the forward posture of sitting.
- Common Mistakes: Don't push the pose too far, especially if you have lower back issues. Engage your core to protect your spine.
- Expert Tip: Imagine your shoulder blades sliding down your back as you lift your chest.
Child's Pose: A restorative pose that gently stretches the spine and calms the mind. Kneel on the floor with your knees hip-width apart or together. Sit back on your heels (or as close as you comfortably can) and fold forward, resting your forehead on the floor. Extend your arms forward or rest them alongside your body. Hold for 1-3 minutes.
- Example: Use this pose as a resting point between other poses or at the end of your practice. It's perfect for relieving stress and tension.
- Common Mistakes: If you find it difficult to sit on your heels, place a cushion or blanket between your thighs and your heels.
- Expert Tip: Focus on your breath, and let your body sink into the floor.
Thread the Needle Pose: This twist gently stretches the spine and opens the shoulders. Start in a tabletop position. Bring your right arm under your left arm, reaching towards the left side. Rest your right shoulder and head on the floor. Extend your left arm towards the ceiling or overhead. Hold for 30-60 seconds, then repeat on the other side.
- Example: This pose is a great way to improve spinal mobility and release tension in the upper back and shoulders, which often get tight from sitting.
- Common Mistakes: Avoid collapsing into your shoulder; keep your shoulder blades engaged.
- Expert Tip: Focus on twisting from your upper back to deepen the stretch.
Seated Spinal Twist: This seated twist improves spinal flexibility and massages the abdominal organs. Sit on the floor with your legs extended. Bend your right knee and place your right foot on the outside of your left thigh. Twist your torso to the right, placing your left hand on the outside of your right knee and your right hand behind you for support. Hold for 30-60 seconds, then repeat on the other side.
- Example: For those with tight hips, it may be helpful to sit on a folded blanket to elevate the hips slightly. This is also great for digestion.
- Common Mistakes: Don't force the twist. Keep your spine long and use your core muscles to deepen the pose gradually.
- Expert Tip: Inhale to lengthen the spine and exhale to deepen the twist.
Step-by-Step Instructions (with clear, simple steps)
Each of the five poses listed above includes the essential steps to guide you. Here's a simplified overview of how to incorporate them into a 10-minute routine:
- Warm-up (1 minute): Begin with a few rounds of Cat-Cow Pose to warm up your spine.
- Sphinx Pose (1 minute): Move into Sphinx Pose to gently stretch the lower back and open the chest.
- Child's Pose (1-2 minutes): Transition into Child's Pose to provide a resting point and gently stretch the back.
- Thread the Needle (1 minute per side): Perform Thread the Needle Pose to stretch the shoulders and upper back.
- Seated Spinal Twist (1 minute per side): Finish with the Seated Spinal Twist to improve spinal mobility and release tension.
- Cool-down (1 minute): Conclude with another round of Child's Pose, or a few moments of mindful breathing.

Tips for Success (e.g., common mistakes to avoid, modifications)
- Listen to Your Body: Pay attention to your body's signals. If you feel any sharp pain, stop immediately. Modify poses as needed.
- Breathe Deeply: Deep, conscious breathing is crucial in yoga. It helps to relax your muscles and deepen your stretches.
- Consistency is Key: Aim to practice these poses regularly, even if it's just for 10-15 minutes a day. Consistency will lead to the best results.
- Use Props: Don't hesitate to use props like a yoga mat or a block. They can help you modify poses and achieve proper alignment.
- Start Slowly: Don't try to push yourself too hard, especially when you are just starting.
- Example: Consider using a yoga mat such as the Manduka Yoga Mat for added comfort and support during your practice. Its non-slip surface helps you maintain proper form.
Benefits and How It Helps Your Goals
Regular practice of these yoga poses offers a wealth of benefits, particularly for those who spend long hours at a desk. Here's how it helps:
- Improved Spinal Flexibility: The poses gently stretch and mobilize the spine, improving flexibility and range of motion.
- Reduced Back Pain: Stretching the muscles that support the spine can alleviate existing back pain and prevent future issues.
- Enhanced Posture: Regular practice can help to correct poor posture, which is common with prolonged sitting.
- Stress Relief: Yoga is known for its stress-relieving benefits, helping to calm the mind and reduce anxiety.
- Increased Energy Levels: By improving circulation and releasing tension, yoga can leave you feeling more energized and alert.
These benefits are not just anecdotal; they are supported by scientific research. Studies have shown that yoga can be an effective treatment for chronic back pain and can significantly improve quality of life for desk workers. For instance, a study in the Journal of the American Medical Association found that yoga was as effective as physical therapy for chronic low back pain.
How to Fit It Into Your Busy Schedule
One of the greatest advantages of this routine is its adaptability. You can easily incorporate it into your daily life, even with a busy schedule. Here's how:
- Morning Routine: Start your day with a quick yoga session before you begin work. This will set a positive tone for the day and prepare your body for sitting.
- Work Break: Take a 5-minute break every hour to do a few of these poses. This will help to break up the monotony of sitting and prevent stiffness.
- Lunchtime: Use your lunch break to do a more extended yoga session. This can be a great way to de-stress and recharge.
- Evening Wind-Down: End your day with a few gentle stretches to release any tension that has accumulated throughout the day.
- Example: Set a timer on your phone for 10 minutes. Find a quiet space, roll out your yoga mat, and focus on the sequence. You'll be amazed at how much better you feel after just a few minutes.
Quick Warm-up and Cool-down
To maximize the benefits and prevent injury, it's important to include a brief warm-up and cool-down.
- Warm-up: Start with a few minutes of gentle movement, such as arm circles, neck rolls, and a few rounds of Cat-Cow Pose.
- Cool-down: End your practice with a few minutes of relaxation in Child's Pose or Savasana (Corpse Pose). This allows your body to integrate the benefits of the poses.
Next Steps in Your Home Fitness Journey
Now that you've experienced the benefits of these simple yoga poses, consider taking your practice further:
- Explore Other Poses: Learn more poses to target specific areas of your body.
- Increase Duration: Gradually increase the time you hold each pose.
- Deepen Your Practice: Explore other types of yoga, such as Vinyasa or Hatha, to broaden your experience.
- Invest in Resources: Consider purchasing a yoga mat, such as the Lululemon Yoga Mat, or downloading a yoga app that offers guided classes.
- Connect With Others: Join online yoga communities or workshops for inspiration and support. Yoga is a journey, not a destination. Embrace the process, and enjoy the journey to a more flexible, energized, and stress-free you.